I Want to Help Build a Space Again
The products discussed here were independently called past our editors. GameSpot may go a share of the revenue if you buy anything featured on our site.
How To Build A Gaming PC, Plus Sample Builds To Get You lot Started
Building your own gaming PC is a rewarding experience and gives you lot far more control over the pieces and parts that air current up in your PC belfry. Those without any familiarity of the internal workings of a PC may recall that the process is as well daunting and and opt for a pre-built PC. But if y'all're in that camp, y'all'll probably exist surprised to larn that edifice your own PC isn't nearly as colossal of an attempt as it used to exist. If you lot're interested, we've created this handy guide to teach y'all how to build your own gaming PC. We've also included a couple of sample builds below that you could follow in gild to build a loftier-end or budget gaming PC.
Before we dive in, we should note that this guide only covers the actual PC. You'll take to pair it with a monitor, keyboard, and mouse (at the blank minimum). For suggestions on which peripherals to choice up, check out our roundups of the best gaming keyboards, best gaming mouse, best PC gaming headsets, best PC controllers, and best cheap gaming monitors.
Table of Contents [hide]
- A look at some gaming PC builds
- Loftier-end gaming PC build
- $ane,000 gaming PC build
- Tools
- Terms to know
- How to build a gaming PC
- Pace 1: Set your motherboard
- Step ii: Install the CPU
- Step 3: Install M.2 SSD(s)
- Footstep 4: Install the RAM
- Stride 5: Get your example ready for your motherboard
- Step half-dozen: Install your motherboard into your case
- Pace 7: Install your power supply (PSU)
- Pace 8: Connect whatever SATA hard drives/SSDs
- Step 9: Plug your case and ability cables into the motherboard
- Step 10: Install your CPU cooling arrangement
- Step 11: Showtime cable management
- Step 12: Install your graphics menu
- Step 13: Install your Os
- If your PC doesn't turn on
A look at some gaming PC builds
Before nosotros get to the bodily building portion, we need to talk near finding and ownership the parts for your PC. Finding the right parts tin be confusing -- and expensive. Gaming PCs can cost as piffling as $500, or as much as several 1000 dollars to build. Manifestly, more expensive parts ordinarily mean more ability, only shopping for a build that fits your budget is often the biggest obstacle for first-fourth dimension builders. At that place are several components that you need, each with a plethora of models, specs, and compatibility requirements to consider.
We know this can exist overwhelming, and so we created instance builds from hardware bachelor at the time of writing. The first is a high-end rig powerful plenty for bleeding-edge gaming operation, and the other is a more than affordable $m build that will run virtually games at decent settings.
That said, accept our example desktops equally suggestions rather than strict loadouts, since many online stores are experiencing product shortages and aircraft delays due to the global bit shortage. We tin can't guarantee every part in our lists will be available, or even the same price, at a given fourth dimension. In that case, refer to resources like PC Part Picker or Newb Reckoner Build's example builds to notice suitable replacements.
Concluding notation: Our case builds include all the necessary parts for modern PC gaming, simply they only cover the PC itself. Optional parts, like optical drives, aren't included, but you need one to play games or media off discs. Nosotros also skipped accessories, only our ownership guides for the best gaming mice, best gaming headset, best capture card for streaming, best gaming keyboard, and best upkeep gaming monitors can help round out your build.
High-end gaming PC build
Exact price: $3,400
- MSI Gaming GeForce RTX 3070 -- $1,290
- Intel i9-9900K processor -- $750
- Gigabyte Z390 Aorus Ultra gaming motherboard -- $316
- 2x Crucial 1TB NVMe PCIe M.2 SSD -- $130 each
- K.Skill Ripjaws V Series 32GB RAM -- $134
- MSI 1000000 CoreLiquid S280 cooling system -- $243
- EVGA SuperNOVA 1000 G3 PSU -- $168
- Fractal Design Meshify C case -- $99
- Windows 10 Home -- $139
$1,000 gaming PC build
Exact price: $one,053
- MSI NVIDIA GeForce GTX 1650 Ventus XS -- $359
- Intel Core i5-12400Fprocessor -- $185
- MSI B560M-A PRO ProSeries Motherboard -- $98
- Crucial P1 500GB NVMe Chiliad.2 SSD -- $63
- Corsair Vengeance LPX 16GB RAM -- $69
- Cooler Master Hyper 212 Evo CPU cooler -- $35
- EVGA 500-watt ATX power supply -- $fifty
- Zalman S4 ATX Mid Tower instance -- $55
- Windows x Abode -- $139
Note: Prices higher up were accurate at the time of writing, simply they are subject to change.
For the vast majority of your build, you'll be using a No. 2 Phillips screwdriver, but if you're installing Thousand.2 SSDs into your motherboard, then y'all'll want to use a smaller No. i Phillips screwdriver for that.
Flashlight:
Thankfully, virtually every smartphone on the market can be used as a flashlight, and y'all'll probable need it when installing certain cables and components into your case.
Thermal paste:
Y'all'll desire a tube of thermal paste to keep your CPU's temperature low during use. Nigh CPU coolers come with thermal paste already applied, which means you won't need any extra. However, if you do end up buying a tube of thermal paste, you can clean the cooler's paste off and utilize your own.
Terms to know
We've attempted to simplify the process of building a gaming PC equally much as possible here, simply if you're not familiar with PC hardware, some of the terms in this guide may need some description. Nosotros've briefly explained some of the parts and terminology nosotros'll be using beneath. Feel gratuitous to reference this section as you work on your build.
GPU: GPU stands for graphics processing unit; another proper noun for a graphics card. This will handle displaying images on your PC. The more elaborate and complex these images are, the more power y'all'll demand from your graphics bill of fare. The two big names in the graphics card game are Nvidia and AMD.
CPU: The CPU (primal processing unit, also known equally a processor) handles all of the processes and calculations on your PC. For your PC, y'all'll choose a CPU from either Intel or AMD.
Motherboard: The motherboard is where all of the components are installed, allowing them to work together and perform their functions properly.
SATA: SATA is a blazon of connection, like USB, that is used for difficult drives and SSDs to transfer information
PCIe: PCIe is another type of connection, though it'due south nigh commonly used for graphics cards and M.2 SSDs
NVMe: NVMe is a type of connection protocol that can be supported by M.two SSDs. This provides much faster access to saving and accessing data.
M.two SSD: An M.2 SSD is a small stick that provides your PC with storage space. You lot can get a SATA-based M.2 SSD or a PCIe-based 1000.two SSD, the latter of which can support NVMe.
RAM: The RAM (or random access retentiveness) is used to store data and information that is beingness processed by the CPU. The more RAM you have--paired with a good-quality processor--the faster your PC can perform its various functions.
Cooling system: The cooling system is used to protect the CPU from overheating.
PSU: The PSU (or ability supply) supplies your PC and its various components with power.
Bone: OS stands for operating system. Well-nigh gaming PCs will utilize Windows 10--it's what we advise--though some people may want to install Linux.
How to build a gaming PC
Step 1: Ready your motherboard
Parts used: Motherboard

Assembling the motherboard exterior of the case volition make your whole experience much easier to deal with. Our full general dominion of thumb is to install as many parts as possible before screwing it into your case. An important thing to note before starting on your motherboard is that you should refer to its manual every bit oft equally possible, as your specific motherboard may suggest specific ways or places to install your components. Also, go along in mind that certain parts volition require some force when plugging them in, while others only just need to be placed into their respective spots. Please pay shut attention to the following instructions before installing your components.
The starting time thing you lot'll want to practise is brand sure you're assembling your PC on a apartment surface. Don't build it on a carpet--the mixture of static electricity and your PC's parts is a dangerous combination and could cause damage to your components. It's unlikely to happen, but we still propose touching your metal case from time to fourth dimension to help basis yourself and avoid this from happening.
Instead, build your rig in a room with hardwood or laminate floors like a dining room or kitchen--we fifty-fifty went the extra mile and took our socks off. Accept your motherboard out of its packaging and and so identify it on a flat surface. You tin lay it directly on your table, but we personally placed information technology on top of its box to avoid scratching our desk. At this point, you're ready to starting time.
Step 2: Install the CPU
Parts used: CPU, motherboard
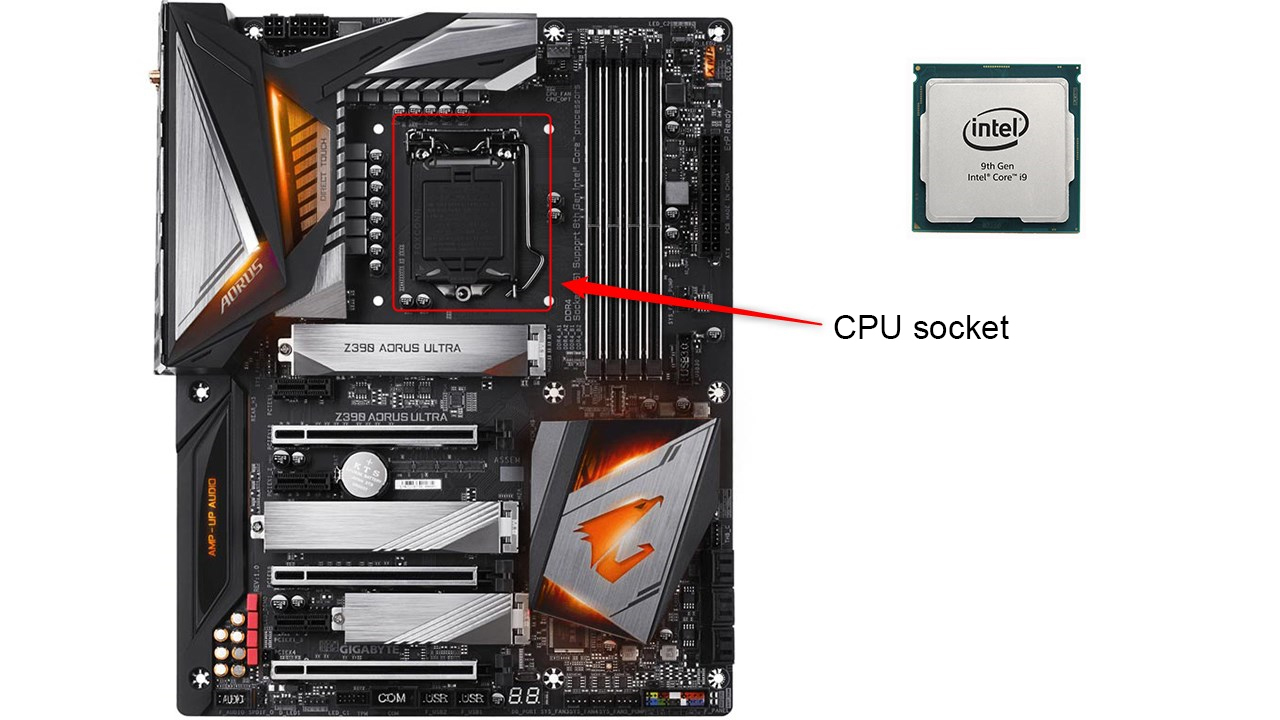
The easiest part of your unabridged build is also the outset: installing our AMD Ryzen CPU. Your motherboard's CPU socket will be protected past a piece of plastic, which yous'll be able to remove when yous open the tray. All you need to do is gently push downward on the tray's metal arm and pull information technology out. In one case it's costless of the tray, lift information technology up to open up the socket and the protective plastic will fall out. Be sure to keep this plastic piece in example of whatever bug with your motherboard, as you'll demand to reinsert it before sending it back to the manufacturer.
At this betoken, your CPU socket tray should be open up, assuasive you to install your CPU on to your motherboard. Your CPU should have some small-scale one-half-circle indents in its board. The CPU socket is designed to fill these indents, making it piece of cake to line up your CPU and install it properly. Once y'all've figured out how to place your CPU into its socket, practise and then gently. Practice not utilize pressure level directly on the CPU--simply close the tray and make sure the metal arm is locked into its original position, which may crave a bit of force.
Step three: Install G.ii SSD(s)
Parts used: Grand.ii SSD(s), motherboard

M.2 SSDs are some other easy step in the process, merely don't forget to reference your manual to discover out which Thousand.2 slots you lot should use starting time. Your motherboard may have protective thermal guards on your M.2 slots, and then remove those get-go. Once you've taken any guards off the motherboard, you tin can slot in your M.2 SSDs. These require a little bit of force to slot into their respective slots, just don't button also hard--they should slide in quite easily. One time the M.ii SSDs are in their slots, the reverse end should be pointing upwards at a diagonal angle. At this point, you take the corresponding screw (that is often included with your motherboard), push each One thousand.2 SSD downwardly, and screw them into the appropriate spots. At this point, you can take the thermal guard and place information technology on peak of each K.2 SSD, screwing it back into place.
Stride four: Install the RAM
Parts used: RAM, motherboard

This is another step where you'll want to reference your motherboard's manual, which should exist able to tell you which order to place the RAM in. If you have 4 slots and but two sticks of RAM, so you should brand sure the 2 sticks are spaced autonomously in either the first and third slot or second and fourth--your motherboard transmission tin advise you here. Placing your RAM apart like this volition aid you get the most out of your CPU. First off, exist sure to flip down the plastic clips on both sides of each slot you plan on using. Inserting the RAM requires more force, only brand sure you outset modest and then ramp up your force per unit area gradually. When you hear a click, your RAM is in its slot. This should cause the plastic clips to flip up, gripping your RAM. If yous detect your clips haven't flipped upwardly, then your RAM may non be seated properly.
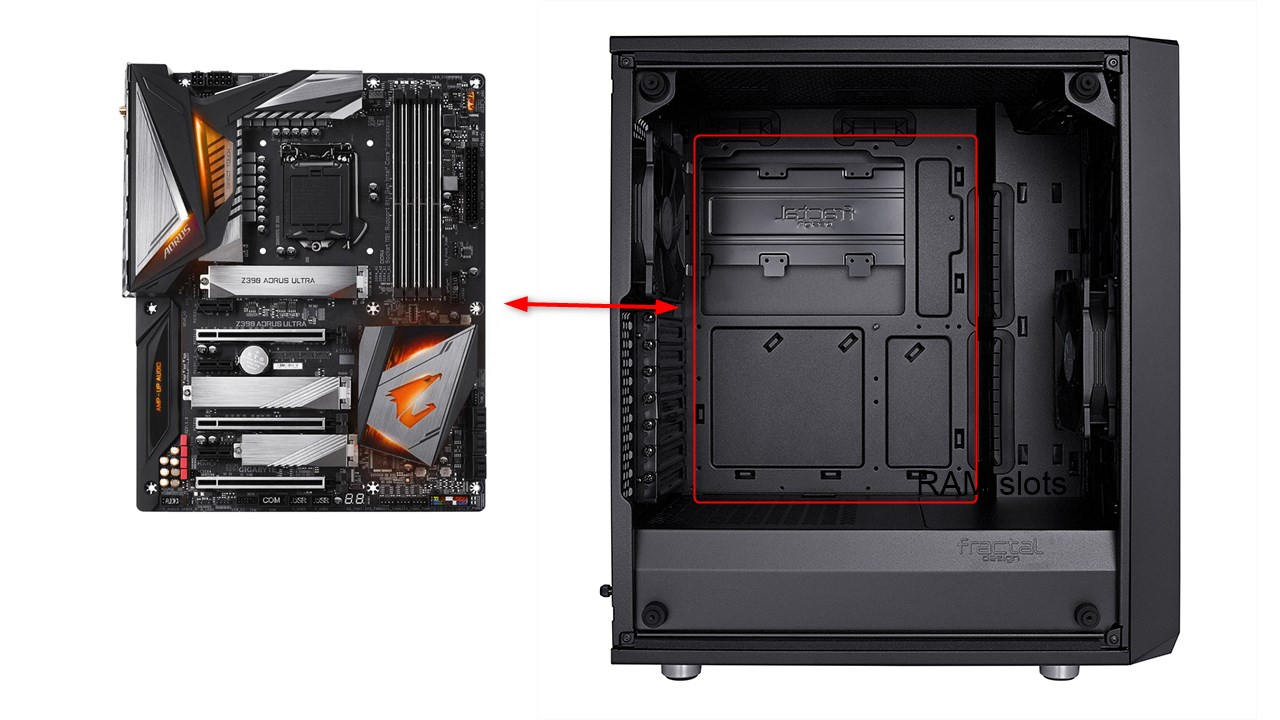
Step 5: Get your case prepare for your motherboard
Parts used: Case

It's well-nigh time to throw your motherboard into your case, only showtime y'all'll need to spiral in some collision screws that y'all'll identify your motherboard onto before screwing it in. These standoffs will come with your motherboard, and once you've located them, you can start screwing them into your case. There should exist near a dozen holes for the standoffs to fit into. Refer to your example's transmission if you're having problem finding them. Once the standoffs are screwed in, you're ready to insert your motherboard.
Pace vi: Install your motherboard into your case
Parts used: Motherboard, case
The standoffs brand it easy to place your motherboard into your case, just don't start screwing it in straight abroad. There should exist a space on the back of your case for your motherboard's I/O ports to fit into. It'll exist a rectangle, and you lot'll want your motherboard to be inserted comfortably into this space so that y'all can admission all of the ports. Once everything fits, y'all can commencement screwing your motherboard onto the standoffs with the advisable screws. Don't forget that you don't desire to screw annihilation too tightly. Just turn your screwdriver until everything is securely tightened, and and then you lot're gear up to movement on.
Step seven: Install your ability supply (PSU)
Parts used: Power supply, example, motherboard
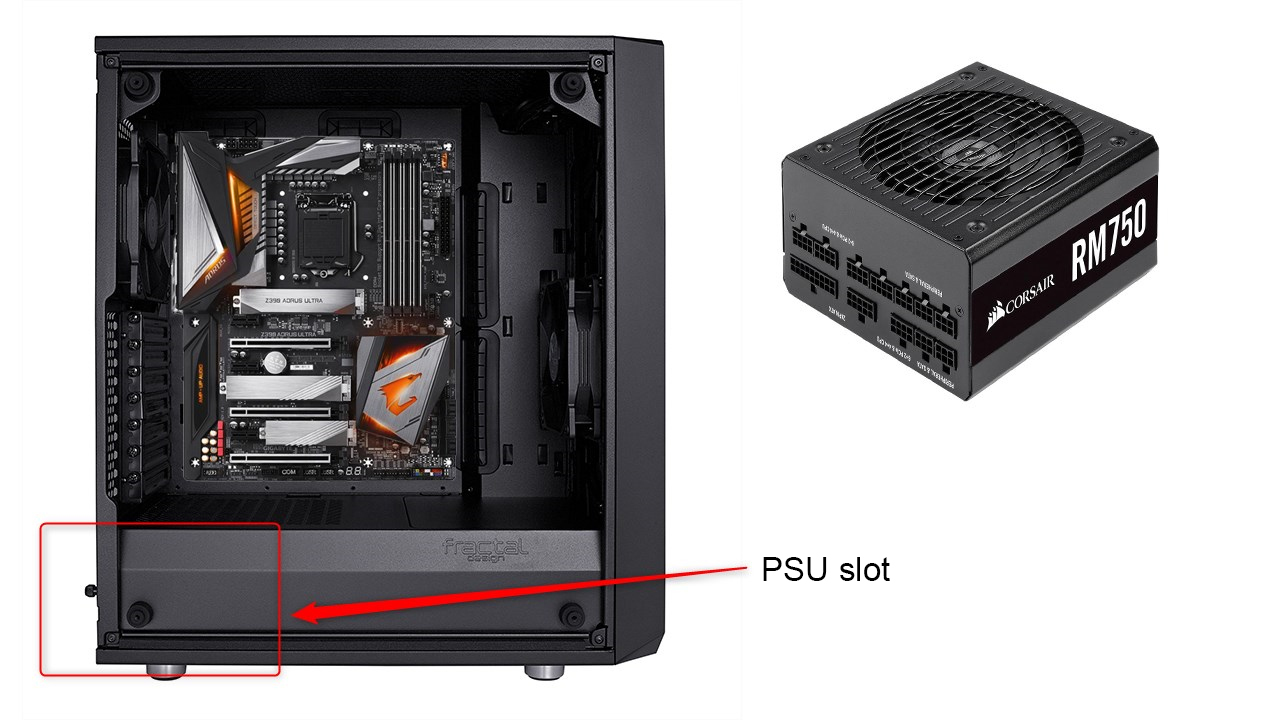
Installing the power supply into your case is often quite easy. Yous'll want to refer to your specific case's transmission for this, simply it'south pretty straightforward. First, we took our case'south mounting bracket and screwed it onto the dorsum of our ability supply. You'll notice your power supply too sports a fan, which is used to circulate air. If yous're planning on placing your finished gaming PC on a hardwood floor or desk-bound, and so feel free to aim this fan downward; if you're placing your gaming PC on a carpeted floor, then you'll desire to aim the fan upward.
Once you've figured out which way your PSU needs to exist oriented, and screwed on the mounting bracket, you can easily slide it into your case and tighten the bracket'southward screws. Depending on how much room you accept for your PSU, you may want to hold off on screwing it in until y'all've plugged in all of its various ability cables.
Step eight: Connect any SATA difficult drives/SSDs
Parts used: SATA drives, case, power supply
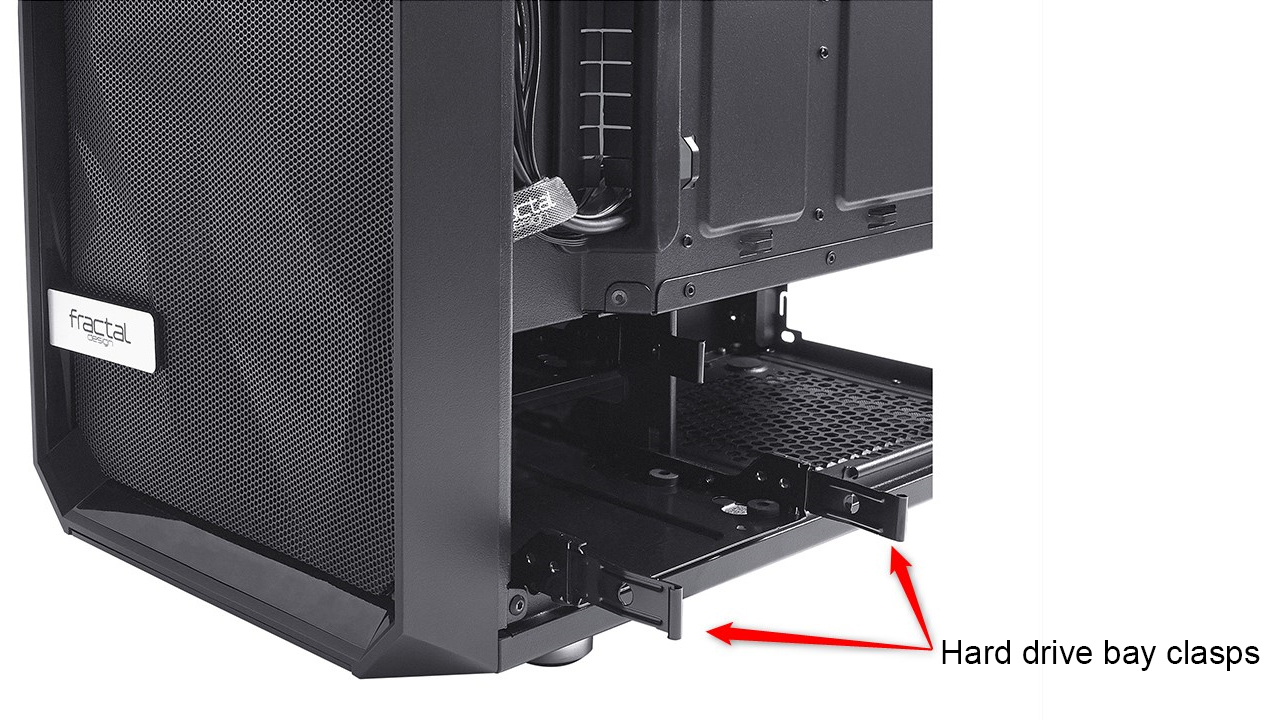
Now that the power supply is installed, you tin can start connecting whatsoever SATA hard drives or SSDs. Your instance should take a specific bay expanse dedicated to holding these kinds of drives. Locate this area, and then look for two metal clasps on the left and correct side of each bay. Clasp these clasps and then pull the bay out. Hither is where you lot'll be able to screw in your SATA drive and keep it stable inside your case. Once this is washed, yous'll want to reinsert the bay into its place, and and so plug a SATA and PSU cable into your hard drive. Detect the SATA slot on your motherboard and plug the other side of the advisable cablevision into it, so plug the other side of the PSU cable into your power supply. Your bulldoze is now installed, though you will need to format it once your PC is up and running.
Footstep 9: Plug your instance and power cables into the motherboard
Parts used: Case, power supply, motherboard

Now, you lot're set to start plugging cables into your motherboard. This part requires some patience, as your case cables are extremely tiny and tin be difficult to orient. You'll want to reference both your case and motherboard manuals during this pace. Some motherboards, like our Aorus Ultra, come with a bus that you can plug the case cables into before inserting them into the motherboard. This makes this step much easier.
Your instance cables make it and so you tin can employ the diverse ports on the front end of your PC in add-on to the power button itself. Of course, zilch is going to happen when yous press that button if y'all don't plug your PSU into your motherboard. You'll want to plug the 24-pin ATX and EPS12V cables into their respective spots on both the motherboard and PSU. You'll be plugging in all of your ability cables into the PSU, including fans, SATA drives, and your cooling system.
Step 10: Install your CPU cooling system
Parts used: Cooling system, CPU, motherboard

Installing your cooling arrangement can exist a somewhat nerve-wracking feel, specially when applying the thermal paste, only it's a lot easier than it sounds. The offset thing yous need to do is mount the organisation'south bracket to the motherboard. You'll need admission to the back of the motherboard tray, as you'll be screwing part of information technology to the back of the tray. This'll give you lot the spots you demand to set the libation's pump onto your CPU and motherboard. Before y'all exercise this, nevertheless, there are a few other steps.
Liquid-based CPU cooling systems come with a radiator equipped with fans, which you'll want to screw into your example. Of class, you'll need to figure out where you desire to install it. We recommend screwing it into your case's superlative grill, as it'll permit for more airflow, simply some cases may non accept a summit grill, and you'll need to install it on the back of the case. One time yous figure out what position you're going to go with, you lot'll screw the radiator into the grill itself. In one case you're done this, you lot're fix to attach the pump.
First, you'll want to apply some thermal paste. Some coolers come with thermal paste already applied; if that'due south the case, your cooler'due south thermal paste is most likely capable of treatment the job, and you may be able to skip this adjacent step. Y'all can also easily remove the cooler's paste with a dry material if you bought thermal paste you'd rather go with. You'll want to apply a pea-sized glob of thermal paste into the center of your CPU. During this pace, always go smaller than bigger. Once practical, you tin can press the libation into its position on the CPU and thermal paste. If you feel like you've accidentally applied likewise much thermal paste, don't worry: It's equally easy as wiping the CPU off with a dry cloth and rubbing alcohol and trying again.
Once the pump is installed, you'll want to brand sure all of your cooling arrangement's wires are plugged into the right spots. Our particular cooler required united states of america to plug a micro-USB cable into our pump and the other side into our motherboard.
Step 11: Kickoff cable management
Parts used: Instance
Earlier we move on to the terminal step of physically building your PC, y'all may want to do some cable management to clean up. This'll create some room for air circulation and accessing your components if you ever desire to upgrade later. Most cases come with Velcro straps or zero ties, but I always proceed a bag of Velcros on paw merely in case. The case nosotros went with, Fractal'south Meshify C, includes an crawly area for cable direction that'south equipped with a series of Velcro straps. It's located on the back of the motherboard tray. Nosotros were able to slide all of our cables into this space and keep information technology all attached up nicely.
The only zip ties we used were for our CPU cooling system'south wires, which were thin and plentiful. This made it easier for us to orient them through the holes in our case to reach our desired spot. Just make certain you don't over-tighten your zip ties as doing so could harm your cables.
Step 12: Install your graphics card
Parts used: Graphics bill of fare, motherboard

Finally, information technology's time to discuss the component y'all're probably the most excited nearly. The graphics card is like shooting fish in a barrel to install. Kickoff, you'll need to remove an advisable number of expansion slot inserts from the back of your case to fit your graphics card. This will vary depending on which GPU y'all go with, simply two is usually the safety number--our MSI GeForce RTX 2080 Ti takes up two. Once you unscrew and remove them, figure out which PCIe Express slot you'll demand to insert your card into, then flip its plastic notch at the far end of the slot downward to prepare for installation. At this point, all you need to do is line up the graphics menu with the PCIe Express slot and then button downwardly until the plastic notch flips up and clicks. Again, you lot don't need a lot of force to push it in, merely you will need to push the graphics card into its slot until y'all get that click. One time you hear that, you tin can screw your graphics card's mounting brackets into the example using the expansion slot'southward screws and holes.
At this point, you lot demand to plug your graphics carte du jour into your power supply to give it power. (Low-end graphics cards don't typically crave extra power, so if that's what you lot're working with, you're good to skip this footstep.) Take the appropriate cables included with your power supply and plug i end into the graphics card; then, plug the other into the PSU. Information technology'south okay if there are parts of the cables that go unused--just make sure every port on the graphics card has part of the cable plugged in.
Stride 13: Install your Bone
Parts used: USB thumb drive, case
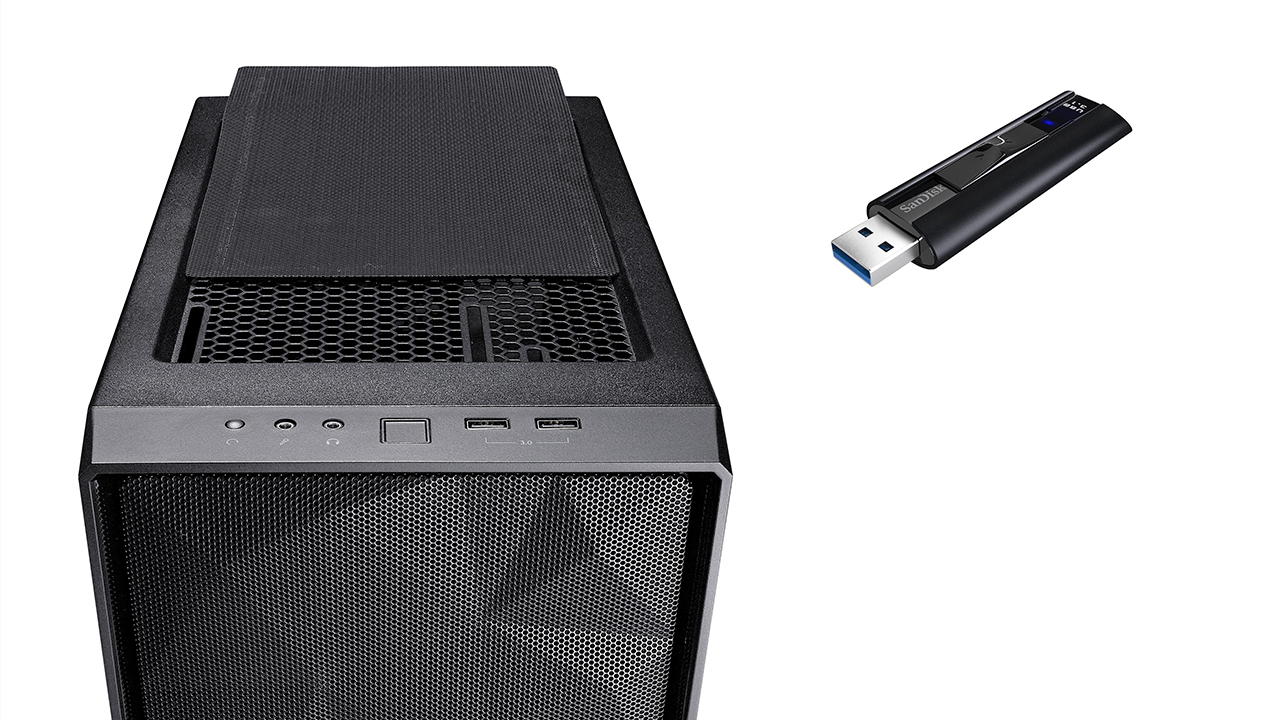
Once y'all've ensured a tidy PC with all of your cables managed, you should connect an HDMI cable to your PC and plug the other end into a monitor. Plug the ability cable into your PSU and the other cease into an outlet; so, flip the power switch on the dorsum of your PC to its "On" position. Press the power button on your PC, and if it turns on, you're about good to go.
At this signal, you lot'll need another PC and a fast USB drive of at least 8GB--nosotros suggest the SanDisk Extreme Pro. You'll and so desire to caput over to Microsoft and follow the steps provided in that location. This will help you create an installation device out of your USB drive, which y'all tin plug into your PC before booting it up. Upon starting your PC, it should go straight into the Windows 10 installation process. Follow the steps here and expect for it to install. In one case you're done, you should be adept to go, though you lot volition need to buy a proper license for Windows x from Microsoft. If you do this from your new PC, it'll actuate automatically. On this is all setup, you lot're skilful to go, disallowment the installation of an optical drive, if you chose to get one.
If your PC doesn't turn on
If your PC doesn't boot, don't worry: It's certainly non the terminate of the earth. There are a number of things that can cause a PC to not kicking up on your first try, and save for any product malfunctions, they're easily solvable. Here are a few things you can do to troubleshoot your powerless PC.
Is the power supply plugged into an outlet?
This is a simple fix. Just plug your PC into an outlet, and you should be expert to go.
Is the power supply's switch turned on?
Make certain you've flipped your PSU's switch into the 'On' position before powering on. This is an easily overlooked issue with a solution that's just equally easy.
Are your power supply cables seated in the motherboard properly?
This is the side by side thing yous should double-bank check. Reconnecting the cables could be what you need to finally deliver power to your PC.
Are your case's cables plugged into your motherboard properly?
It'due south important to get this pace right considering if you push button your example's power push and its specific cablevision isn't plugged in correctly, it won't exist able to showtime your PC. Some motherboards come with a serial bus that you can plug your case's cables into before connecting to your motherboard.
Are your parts installed correctly?
This is the last thing to check as it can exist the about fourth dimension-consuming. Reconnecting your RAM and CPU or simply switching the RAM sticks into different slots could exist the solution you're looking for.
If all this fails, and so your components may be defective.
Unfortunately, this tin happen. Sometimes when building a PC, you realize that i of your components isn't working correctly. At this bespeak, you'll demand to contact the manufacturer of your office and enquire them about their return policy. The vast majority of large PC component manufacturers have return policies that will encompass lacking parts, so you don't accept to worry. It simply might take a little longer to enjoy your brand-new gaming computer.
- Best 4K TVs For Gaming
- Best Monitor For PS5, Xbox Series X
- Best Gaming Chairs
- + Show More than More Tech Picks From GameSpot Links (5)
- All-time Inexpensive Gaming Monitors In 2022
- The Best PC Gaming Headsets For 2021
- The Best Nintendo Switch Controllers Yous Tin Purchase
- The Best VR Headsets In 2020
- The Best Webcam For 2021: Peak Picks For Streaming On Twitch And YouTube
Got a news tip or desire to contact us directly? Electronic mail news@gamespot.com
Source: https://www.gamespot.com/articles/how-to-build-a-gaming-pc/1100-6476963/
0 Response to "I Want to Help Build a Space Again"
Postar um comentário